Evaluation of Character Design - Unit 205
Now closing on the deadline just hours away i am going to write a summary of the events and problems i had faced. I can honestly say that this unit and not knowing what's what is like an emotional roller coaster. One moment you're thinking "yes yes i've done it!" and then you spot something thats gone wrong, like me somehow losing my RP Solver option in the drop box of IK handles, even with restarting maya it didn't re appear, so with a little help from google i ended up coming across some mel script which enters the option back into the drop box. WHilst doing this i learnt that you can enter different solvers into maya such as a Multi-Chain solver, which solves for multiple IK handles at the same time - used for rigs with complex motions when animating like a scorpion/spiders legs or tentacles.
Modeling and rigging were my main focus' as opposed to animating this term because at the beginning of this project i had absolutely no idea how to do these things to a decent standard, so i thought this was the best way to learn. I may not have come out with perfection but i thought that with the Idents i'd sort of done that type of brief in my 6th form, but i remember trying to decide whether to go for chop shop or character animation because i had so much reference material back at home in lincolnshire as i practically had two or three chop shops in my back garden! and there's always farm machinery just left there rusting. I could just visualize the possibilities for that. The thing which swayed me for character design was that as far as i know we are covering an environment project next term so i would be able to develop my texturing and modeling skills further there.
Modeling
I had not really understood modeling last year but it was definitely helpful to have touched on it as i could understand more of what was going on. Through my project creating both the characters i begun with creating Pocahontas in nurbs using the EP curve tool, lattices and revolve to get a more organic feel. I was really impressed with what i was doing but she really should be in polygons so by converting her i was able to control the amount of polys she would take on. If i'd converted her whole body at once then there'd have been too many on the hands and feet, so made the conversion by selecting different faces. Though i had to delete faces that were inside the mesh under the arms and by snapping verts to other verts to clean this up didn't look so good. what i really liked about this model was the eyes, using the book i created two nurbs spheres, one with a different start and end sweep (which is my eye lid) when i using the set driver key to control the blinking i think this is really nice movement for a blink, even with a lip for the eye line. I actually ended up exporting Pocahontas' eyes as a maya binary file which i was then able to import the eyes as a scene into my Cornelius scene as a separate layer.
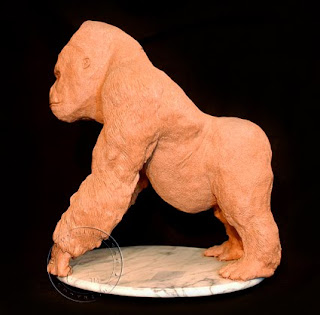
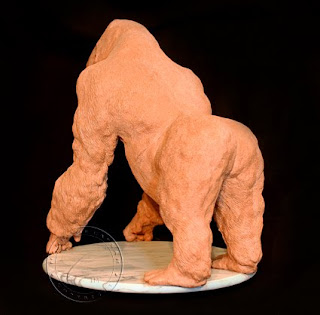
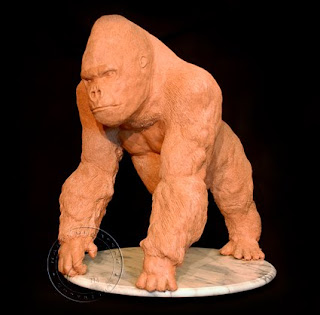
By that time of the project i thought to be cracking on with the Cornelius model. I created Cornelius using polys because after my last experience of using nurbs and then converting was a bit time consuming and fiddly. I think the reason i played in nurbs first was because i was intimidated by the polys and the book Maya Character Rigging went through the whole process of researching your character to modeling using nurbs ( with the option to convert to polys). The more time i spent on this character the better he looked in my opinion. I wasn't restricted by sticking exactly to my reference drawings as they were only a guide line, and looking to other photos i'd realized that i hadnt drawn him originally with enough umph. For example, his shoulders needed to be broadened, his head brought more into the body as gorillas dont have much of a neck, his arms to be brought more into the shoulders as opposed to stuck on the end of the frame. As i developed him i got more of a feel for what i wanted, and as no artist is never really happy with their outcomes (always see something to improve) i could finesse him for a long time and not get bored.
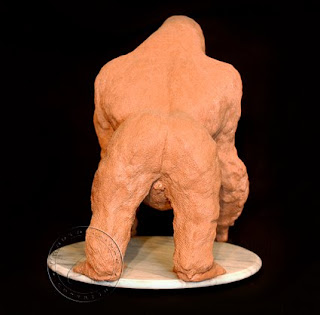
I had so much fun creating both characters, maybe Pocahontas was a stepping stone to moving onto using polys in modeling. When other people have commented on my gorilla model i've noticed everyone seems to like the bum, i am personally rather fond of the model as a whole, i think for a first timer this is something am proud of producing, until the next time i create a model as i hope it will be better yet.
Rigging
Rigging was possibly the most difficult hurdle i experienced in this project as it was not very easy to grasp what was going on, but after mistakes and having to re rig the arms i think i have the basic understanding of what's what. Placement of the joints is crucial for where the verts will be influenced to, so if i placed a joint too close to the elbow this would have a negative response when the mesh is bound to the skin, and would maybe involve more weight painting. However i placed my joints in the centre of the mesh from the beginning so i haven't experienced anything too horrific. Also when placing joints it helps to add a little bend so that when it comes to setting the preferred angle the rig will know which way to turn.
When setting up attributes i felt i picked it up really well when using the set driven key following the book, i even used that knowledge to make my own attribute for the nose wiggle.
IK FK, well, i dropped the FK from the rig setup as i was following the book and i didn't have enough time for errors as i had heard other students who did this didn't have success. I would have liked to have tried if i had enough time as i don't understand fully why i'd want to use FK, something about allowing the character to move fluently.
Overall the rigging was difficult and stressful, i didn't want to stray from the book because i didn't know enough to take lessons from different tutorials. So heavily rely on this book wasn't the best thing but i got through it with help from tutors and other students on the book. I think it may have been easier if i had rigged the girl because of her being modeled in the T pose. For the gorilla i found him difficult as altering a Bi-Pedal rig tutorial to a quadruped when i wasn't sure it'd work. So as i had problems with the way Cornelius' arms were rigged i went on and changed the arms rig from book to re rig them as legs. This would work because i don't intend for him to be humanized.
Another dilemma was i had to parent following by what i guessed went where which was becuase the book skips these parts.
Texturing
I think that my texturing is nothing special, i didn't focus too much but i did some exploration into bump mapping with the thumb prints, and i would like to go back and spend some time remapping so that i can put a nice looking gorilla onto my showreel as i will have the time. I decided to use the uv map instead of the 3D paint tool because you have more control in the UV editor.
Am i happy with my over all out come?
Definitely. I can see how imperative it is to have good drawing skills, i would have liked to have developed my characters into more conceptual pieces and done more of the research at the beginning as opposed to 'crossing the bridge when i get there' but i liked the freedom to stray from my ideas and just have fun being creative. I think i should try rigging again, i think that if you don't understand it and just ignore the difficulty that wont help me progress, and if i wanted to be an animator i need to be able to talk to the riggers in their technical language. I also think it's important to know and have a understanding of the process involved. What I'm most pleased with is i get the feel that my gorilla is elegant, and i wanted him to look like a grandpa, even without me modeling the glasses i get that feeling from the brows and head shape. innocent looking perhaps. The one thing that makes me sad was that i am so close to him being able to animate and it would have been great if he was ready for the deadline.
What would i do differently next time?
Make a time schedule and stick to it. I made a rough guide but i had no clue how long modeling or rigging would take me, now i am aware of my capabilities i will be able to manage my time better in future work. Also to be more clear of what i want and stick to it, it might've been better to work in groups for this project as we were taking time from our own work to help others along, visa versa.
Do i feel i've gained a lot through the process of this unit?
Endless amount of learning through trial and error, yes i have gained a lot. I feel that i work and learn faster when i am working towards a brief, i can't seem to motivate my self to learn out side of college, but this is going to have to change, maybe volunteer my skills out to work for freelance projects. Best way to learn on the job i say.
A though when working in the class room was that it was good that every one helped each other if they could, but the negative side being when you learn for yourself or from others you might be picking up bad habits in the workflow. I guess everyone has their own ways that work for them though.
Final Note
I have not been bored at the slightest working on this project and i feel i've learnt so much which i can develop on in my own time, already thinking and sourcing bits for the next term so bring on the next unit!!
Friday 27 November 2009
Thursday 26 November 2009
Painting Weights.. the beginning
First to get all my rig working happily together i needed to create a master controller for it all to sit on. This was simple, i just created a nurbs circle and then altered the points after pressing the F8 key and then freezing the transformation so that everything is set to 0.
To parent everything together i followed the book however as shown below when parenting the hadn controlers didnt effect the arm, so i simply just sorted this by shuffling about what parents to what.
Once all the rig is set to one controller i need to begin the weight painting process so by selecting all the joints then shift selecting the mesh i did a smooth bind to create the moving character. Smooth bind allows the geometry to be affected by the movement of the joints and handles i have set up in the rig.
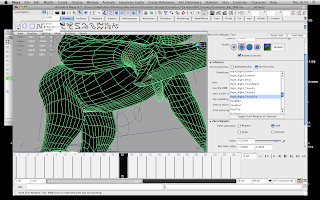
Painting weights is basically where you are altering what joints or handles the vertices are influenced towards. There are two ways to paint weights, one in the component editor which allows you to select each vertices and then you come up with a list of vertices as shown below and a top list of what joints/handles these vertices are influenced to. To change where a vert is influence by say, in the nose, i don't want the arm joints to affect the nostril so i would find the tab in the component editor and select the whole column and change the values to 0 which would mean that there is no influence from the arm.

The other way is to use the paint weight tool brush, where you select the joint you want to use to influence your vertices and by clicking and dragging you add or subtract the influence depending on the brush setting, adding is the white, and areas not influenced are black.

So far i have only begun to paint the arms, nostrils and head weights, i have a feeling the back legs wont be so bad fingers crossed. However in the picture above i was having major problems with the foot, and using the brush tool i couldn't figure out what was going on so i went into the component editor and checked the values, by altering them i eventually figured waht was going on.
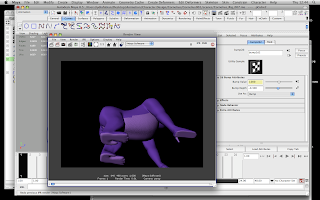
Playblast of animation without painting weights to the mesh
Playblast of animation with painting weights to the mesh
I can notice a definite positive effect of weight painting, however i am still having trouble with some verts under the arms.
Playblast of animation before weight painting on head sections
Playblast of animation after weight painting on head sections (still working)
Again can see the effects this has but more work needed here for sure however here the neck is not affected byt the head movement
Things left to do -
- Finish weight painting, back legs, neck, feet
- Animate short sections showing rig movements and evaluate
- Create spin cycle of model progressing, wire frame, joints
- Evaluate project and what i have found difficult and parts i enjoyed

To parent everything together i followed the book however as shown below when parenting the hadn controlers didnt effect the arm, so i simply just sorted this by shuffling about what parents to what.

Once all the rig is set to one controller i need to begin the weight painting process so by selecting all the joints then shift selecting the mesh i did a smooth bind to create the moving character. Smooth bind allows the geometry to be affected by the movement of the joints and handles i have set up in the rig.
Painting weights is basically where you are altering what joints or handles the vertices are influenced towards. There are two ways to paint weights, one in the component editor which allows you to select each vertices and then you come up with a list of vertices as shown below and a top list of what joints/handles these vertices are influenced to. To change where a vert is influence by say, in the nose, i don't want the arm joints to affect the nostril so i would find the tab in the component editor and select the whole column and change the values to 0 which would mean that there is no influence from the arm.

The other way is to use the paint weight tool brush, where you select the joint you want to use to influence your vertices and by clicking and dragging you add or subtract the influence depending on the brush setting, adding is the white, and areas not influenced are black.


So far i have only begun to paint the arms, nostrils and head weights, i have a feeling the back legs wont be so bad fingers crossed. However in the picture above i was having major problems with the foot, and using the brush tool i couldn't figure out what was going on so i went into the component editor and checked the values, by altering them i eventually figured waht was going on.
Playblast of animation without painting weights to the mesh
Playblast of animation with painting weights to the mesh
I can notice a definite positive effect of weight painting, however i am still having trouble with some verts under the arms.
Playblast of animation before weight painting on head sections
Playblast of animation after weight painting on head sections (still working)
Again can see the effects this has but more work needed here for sure however here the neck is not affected byt the head movement
Things left to do -
- Finish weight painting, back legs, neck, feet
- Animate short sections showing rig movements and evaluate
- Create spin cycle of model progressing, wire frame, joints
- Evaluate project and what i have found difficult and parts i enjoyed
Change in Brief
My aim was to produce the needs of the brief, and in a way i feel I've been creatively restricted due to the me not knowing how to rig, model, texture ect.
With the deadline getting closer i decided that it would be better to have produced one working rig and textures as opposed to two modeled and maybe half rigged characters. So in conclusion i have stopped modeling Pocahontas and decided to put all my attention into producing one quality piece of work.
I feel i will not be able to be at the animating stage at this point as i am just painting weights on my character. However i will hopefully be able to produce some short clips showing character movement, and i also plan to include for my hand a spin cycle of how my character model has developed showing joints on their own and in wire-frame for an all over look.
I feel i have worked hard but as i didn't know what to expect and what timescales to expect for a first timer i have probably procrastinated a little, but if anything I've learnt to just dive straight in or you're left with little time to produce the work when you eventually have to get around to it.
Texturing and Bump Map
To add different colours to my model i had to set up the UV editor which i did using planar mapping, i had a few troubles but i don't recall saying how i got the colours to the places i wanted.
So here's a quick re cap - to add the desired colour to my model i took a snapshot of my UV editor which i then saved as a jpg at 1024 bits, this was because when i saved as the preset 512 i found that with the texture in a higher resolution i wasn't getting a pixelated look on my model. I then went into Photoshop and imported my UV jpg file, created a new layer on top of the background layer because i then painted on the new layer over the texture editor (shown below). I then flattened the image and exported as a tiff (could have used a tga also), then back in maya int he material attributes of my model i applied the texture file.
The UV map above is different to the previous one as i will need the main body larger so i can apply my finger print bump map with more detail.
Bump Map
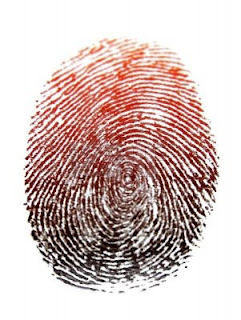
For my model i wanted the look of having finger prints and smudges on the surface like clay, so for this i would need to have fingerprints, photoshop and my UV editor so i can apply my fingerprints to specific parts of the model.
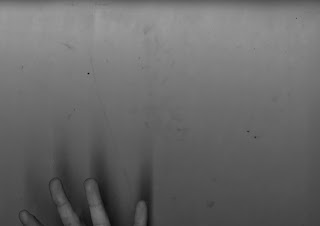
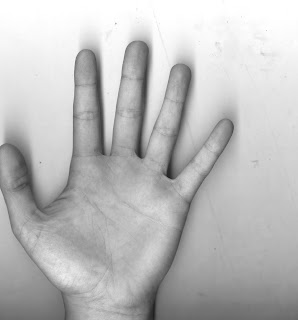
So for finger prints i decided why not try scanning my hand in a high resolution so i capture the detail of the prints.
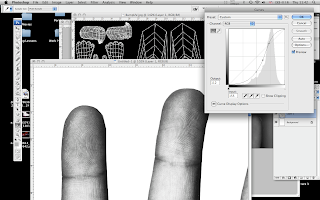
So the next thing to do was set up the image for bump map as to create the defromation on the model is effected by black(depth) and white(raised), though you can change which way it works in maya. So in the screenshot below i am just using the curves tool in PS to get the best contrast between the fingerprint lines, the better the contrast the better the print.
I also created another layer which i filled with a light grey tone which helps to control the focus of the bump, because if the image is even but there is a darker section the ther sections are cancelled out, so with this grey layer above i can bring the poacity down on the layer, and then selecting the brush and lowering the opacity there i am able to paint over the darker sections to even the image.
I would then place the print on top of the UV image which is being used as a reference for placement, and export as a tiff. Returning to maya and in the material attributes i add this tiff file to the bump map.
Below is what happened to the under belly when i tried applying the under palm print to the mesh, it looks veiny becuase i had not controlled the contrast too great in PS image.
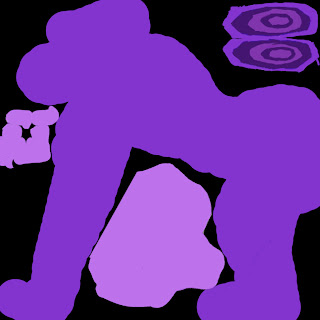
So i then thought up that maybe it'd be more effective using inked thumb prints, i used a secondary source for these though as i didn't have ink available. I did the same to these images in PS as my scanned finger prints and layed them on top of the desired place on the UV editor

So in the screenshot below we can see a clear print shape, i like this :) so i am thinking if there's enough time i would like to place some various prints and maybe try smudging them in PS so that when in maya it might look like some one has tried to smooth out the clay.
Because of the way i had mapped my mesh, for me to have more control over the thumb print i would need to map out the different sections, maybe a sphere map because in the image below i had applied my thumb print on the UV in PS on top of the back, which of course is over lapped so i can't get so much control there without re mapping.
But on the image below we have a successful print on the under belly.
So i have learnt how to use bump maps, and i would love to have had the time to explore more with this. i would have liked to have tried using my own plasticine and scanning in a flat mold which i have pushed which would show up the finger prints maybe on a high res scan.
I mght not push this into my finished piece now as i do not have enough time.
So here's a quick re cap - to add the desired colour to my model i took a snapshot of my UV editor which i then saved as a jpg at 1024 bits, this was because when i saved as the preset 512 i found that with the texture in a higher resolution i wasn't getting a pixelated look on my model. I then went into Photoshop and imported my UV jpg file, created a new layer on top of the background layer because i then painted on the new layer over the texture editor (shown below). I then flattened the image and exported as a tiff (could have used a tga also), then back in maya int he material attributes of my model i applied the texture file.

The UV map above is different to the previous one as i will need the main body larger so i can apply my finger print bump map with more detail.
Bump Map
For my model i wanted the look of having finger prints and smudges on the surface like clay, so for this i would need to have fingerprints, photoshop and my UV editor so i can apply my fingerprints to specific parts of the model.
So for finger prints i decided why not try scanning my hand in a high resolution so i capture the detail of the prints.


So the next thing to do was set up the image for bump map as to create the defromation on the model is effected by black(depth) and white(raised), though you can change which way it works in maya. So in the screenshot below i am just using the curves tool in PS to get the best contrast between the fingerprint lines, the better the contrast the better the print.
I also created another layer which i filled with a light grey tone which helps to control the focus of the bump, because if the image is even but there is a darker section the ther sections are cancelled out, so with this grey layer above i can bring the poacity down on the layer, and then selecting the brush and lowering the opacity there i am able to paint over the darker sections to even the image.

I would then place the print on top of the UV image which is being used as a reference for placement, and export as a tiff. Returning to maya and in the material attributes i add this tiff file to the bump map.
Below is what happened to the under belly when i tried applying the under palm print to the mesh, it looks veiny becuase i had not controlled the contrast too great in PS image.

So i then thought up that maybe it'd be more effective using inked thumb prints, i used a secondary source for these though as i didn't have ink available. I did the same to these images in PS as my scanned finger prints and layed them on top of the desired place on the UV editor


So in the screenshot below we can see a clear print shape, i like this :) so i am thinking if there's enough time i would like to place some various prints and maybe try smudging them in PS so that when in maya it might look like some one has tried to smooth out the clay.

Because of the way i had mapped my mesh, for me to have more control over the thumb print i would need to map out the different sections, maybe a sphere map because in the image below i had applied my thumb print on the UV in PS on top of the back, which of course is over lapped so i can't get so much control there without re mapping.

But on the image below we have a successful print on the under belly.

So i have learnt how to use bump maps, and i would love to have had the time to explore more with this. i would have liked to have tried using my own plasticine and scanning in a flat mold which i have pushed which would show up the finger prints maybe on a high res scan.
I mght not push this into my finished piece now as i do not have enough time.
Colour choices
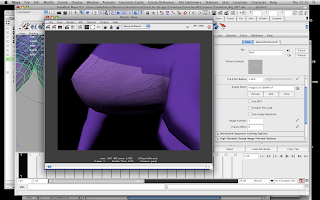
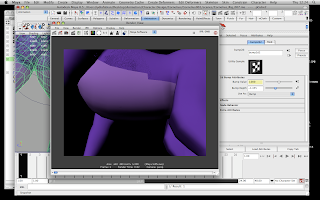
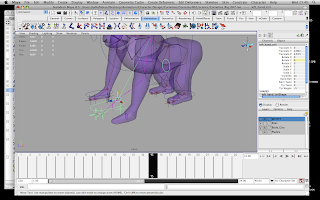
Ok so here i have already placed the colours onto my texture but you guys dont know why i chose to use purple.
I wanted the colour to be bright and eye-catching as its not every day you see a purple gorilla. I didn't want to stick to the original colours of the silver back gorilla because i see my gorilla to be targeted at a young audience.
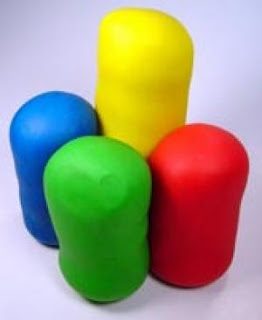
If we look at young childrens toys they are almost always bright fluorescent colours;
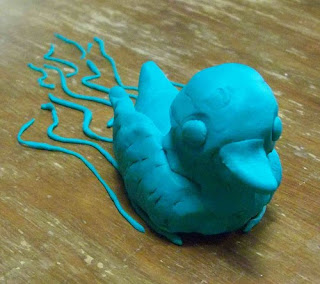
Above are just some images of plasticine, wonderful and bright colours, and how the colours sit next to each other is never in a perfect straight line and they wont every mix, but just make an icky mess. For the duck model above, you can see the lines of where the eyes and beak had been added, i should have taken more attention to existing clay models and next time i will create a hand made version of what i want my 3d design to look like when modeling. If i had have made a 3d little clay or plasticine model for my gorilla i would have noticed the detail of the crease line when things such as the eyes and beak on the duck have been added.
Just looking to textures i came across some one else silver back gorilla model (shown below) and again just shows me how much you can get from making your own reference model. You are able to understand the shape and depth of the character, let alone textures.
exaggeration, highly imaginative writing (also has negative connotations)add kids tv shows
Ok so here are some more examples of colours used when targeting a young audience, we have Teletubbies and Tweenies. First things i notice when looking at Teletubbies is the bright colours and simple shapes used. Not a fan of the show myself but just though this was a nice reference with as they take on the plasticine colours.

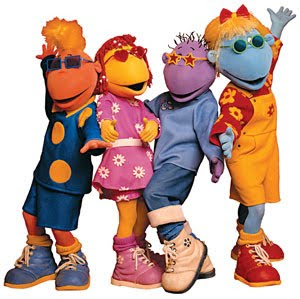
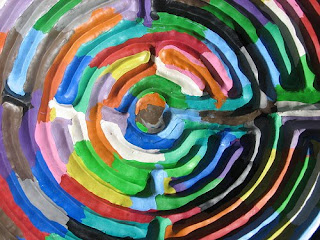
I had also looked into colour palettes which go with purple and with this first set below it is pretty muc the tweenies colour palette.

This colour swatch below i feel is taking more of a plasticine look because the colours are vibrant

and these last two sets i am drawn to more because i want the gorilla's body to be one hue of purple and then his underbelly and the bottom of his feet and hands to be a lighter pastel shade.


I wanted the colour to be bright and eye-catching as its not every day you see a purple gorilla. I didn't want to stick to the original colours of the silver back gorilla because i see my gorilla to be targeted at a young audience.
If we look at young childrens toys they are almost always bright fluorescent colours;


Above are just some images of plasticine, wonderful and bright colours, and how the colours sit next to each other is never in a perfect straight line and they wont every mix, but just make an icky mess. For the duck model above, you can see the lines of where the eyes and beak had been added, i should have taken more attention to existing clay models and next time i will create a hand made version of what i want my 3d design to look like when modeling. If i had have made a 3d little clay or plasticine model for my gorilla i would have noticed the detail of the crease line when things such as the eyes and beak on the duck have been added.
Just looking to textures i came across some one else silver back gorilla model (shown below) and again just shows me how much you can get from making your own reference model. You are able to understand the shape and depth of the character, let alone textures.


exaggeration, highly imaginative writing (also has negative connotations)add kids tv shows
Ok so here are some more examples of colours used when targeting a young audience, we have Teletubbies and Tweenies. First things i notice when looking at Teletubbies is the bright colours and simple shapes used. Not a fan of the show myself but just though this was a nice reference with as they take on the plasticine colours.


I had also looked into colour palettes which go with purple and with this first set below it is pretty muc the tweenies colour palette.

This colour swatch below i feel is taking more of a plasticine look because the colours are vibrant

and these last two sets i am drawn to more because i want the gorilla's body to be one hue of purple and then his underbelly and the bottom of his feet and hands to be a lighter pastel shade.


Wednesday 25 November 2009
Rigging some more..
I am taking longer than i wanted to when rigging as i keep coming up with problems when rigging that i don't understand.. and it takes time to get things right when you dont know how to fix them, usually waiting to get into college the next day to find a tutor to help if not the internet.
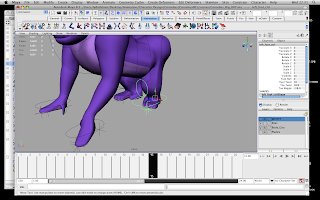
Before today i hadn't even realized i had problems with my front arms until i experimented and moved the handle controls.
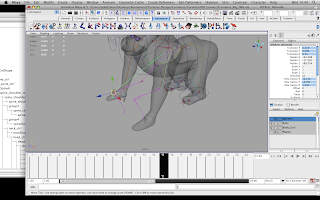
In the above picture you can see that for the left arm i have two handles, an IK and FK. When rigging and following the book i decided to drop doing the FK as i couldn't figure out the FKIK switch so with time cutting close to my target deadlines i made the cut. So there was no easy way to fix this problem other than recreating the arm all over again. Which was time consuming as instead of following the book and rigging the arms as arms, i chose to rig them the same as the legs because my character is a quadruped. One thing that worried me was that as i am following the book for a Bi-Pedal character for rigging, i remembered that i am creating a quadruped and that using one for the other might not be the best for achieving the best movement for my gorilla. So i guess I'm keeping fingers crossed that things are in the right place as i don't know any different or correct method/way to work in creating a quadruped. Though i had looked online for rigging tutorials i found digital tutors had some nice tuts to follow, however as I'd already started rigging i thought to keep it in mind next time i want to create a quadruped to follow Digital Tutors.
Ok so another thing with the geometry was that when i'd skinned it to the rig i go this drag where the arm wouldn't move cleaning.. major weight painting i thought at the time, but also the FK is still there in this shot. I couldn;t simply delete the FK as i still had the same problems, before trying to create new arms i was searching for a way out as opposed to spending more time going over something i thought i'd already covered.. seem to be doing a lot of that! With the texture and my not understanding why the colours didn't show correctly, which i then learnt was that i needded the original lambert on.. simple but unknown for me to think to look there.
So here i had created the arm controllers hand controllers and IK to the joints just as i had done with the back legs which work nicely on the arms and i can get the desired movement, though for the movement i have to run some animation tests trying to break the rig. But i am proud that i'm finally getting somewhere.
For the feet the book teaches me how to create attributes with using locators and IK handles to create some movement easier than key framing the handles to get the same look.
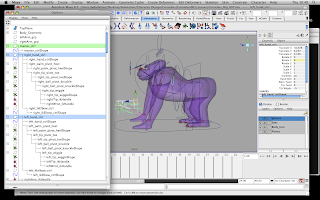
Attributes such as a foot roll, foot twist, a toe wiggle and heel twist all look really nice on my mesh. I have above a screenshot of the heel roll just on the joints so we can see whats going on, also as shown below..
Also here we can see that part of the mesh doesn't hold back like it did before i created this new arm setup. This made me feel happy after realizing i can't do anything to change the way the elbow moves tonight, even though i had re created the arm and handles and attributes twice to see if it was something i'd done wrong when setting up the arm. Cautious of the pole vector constraint and the RP solver which was an issue in the book before.
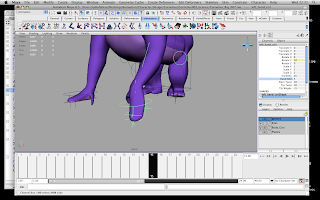
I don't think we can see it too well but i have also changed the values of the added attributes for foot roll on the left foot. The toe wiggle looks really good but i think it'l look more effecting on a playblast which i will put on here soon when test animating bits of the rig.
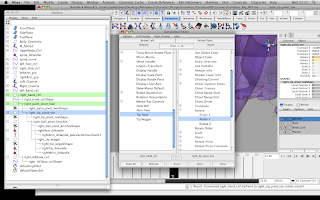
When creating the attributes and keying the values.. i didn't have to go through the Set Driven Key each time but i used the connection editor and by loading up the foot or hand controls into the left i was able to set what controlled what by loading up the locators int he right column. Doing this for all attributes was a nice little trick to learn.
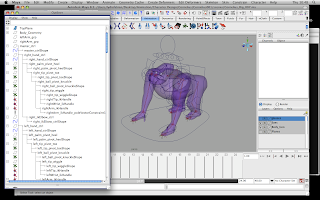
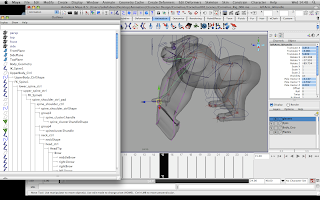
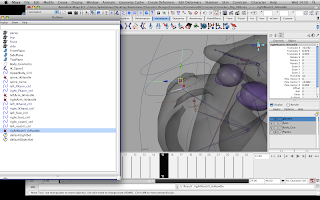
I thought i should just add on the end of this that when needing to parent my clavicles to the spine 6 joint.. that didn't happen for me as you cannot parent from one joint to two separate joints so.. when parenting i had to create a parent constraint which allowed me to have two separate areas to parent each clavicle for each side.
The main red highlighted joint is the spine, you can just see the joint ahead which has red spikes coming from it.. and then just below that you can see where my clavicles are parented too of you follow the joint from the top shoulder.
Before today i hadn't even realized i had problems with my front arms until i experimented and moved the handle controls.

In the above picture you can see that for the left arm i have two handles, an IK and FK. When rigging and following the book i decided to drop doing the FK as i couldn't figure out the FKIK switch so with time cutting close to my target deadlines i made the cut. So there was no easy way to fix this problem other than recreating the arm all over again. Which was time consuming as instead of following the book and rigging the arms as arms, i chose to rig them the same as the legs because my character is a quadruped. One thing that worried me was that as i am following the book for a Bi-Pedal character for rigging, i remembered that i am creating a quadruped and that using one for the other might not be the best for achieving the best movement for my gorilla. So i guess I'm keeping fingers crossed that things are in the right place as i don't know any different or correct method/way to work in creating a quadruped. Though i had looked online for rigging tutorials i found digital tutors had some nice tuts to follow, however as I'd already started rigging i thought to keep it in mind next time i want to create a quadruped to follow Digital Tutors.

Ok so another thing with the geometry was that when i'd skinned it to the rig i go this drag where the arm wouldn't move cleaning.. major weight painting i thought at the time, but also the FK is still there in this shot. I couldn;t simply delete the FK as i still had the same problems, before trying to create new arms i was searching for a way out as opposed to spending more time going over something i thought i'd already covered.. seem to be doing a lot of that! With the texture and my not understanding why the colours didn't show correctly, which i then learnt was that i needded the original lambert on.. simple but unknown for me to think to look there.

So here i had created the arm controllers hand controllers and IK to the joints just as i had done with the back legs which work nicely on the arms and i can get the desired movement, though for the movement i have to run some animation tests trying to break the rig. But i am proud that i'm finally getting somewhere.
For the feet the book teaches me how to create attributes with using locators and IK handles to create some movement easier than key framing the handles to get the same look.

Attributes such as a foot roll, foot twist, a toe wiggle and heel twist all look really nice on my mesh. I have above a screenshot of the heel roll just on the joints so we can see whats going on, also as shown below..

Also here we can see that part of the mesh doesn't hold back like it did before i created this new arm setup. This made me feel happy after realizing i can't do anything to change the way the elbow moves tonight, even though i had re created the arm and handles and attributes twice to see if it was something i'd done wrong when setting up the arm. Cautious of the pole vector constraint and the RP solver which was an issue in the book before.

I don't think we can see it too well but i have also changed the values of the added attributes for foot roll on the left foot. The toe wiggle looks really good but i think it'l look more effecting on a playblast which i will put on here soon when test animating bits of the rig.

When creating the attributes and keying the values.. i didn't have to go through the Set Driven Key each time but i used the connection editor and by loading up the foot or hand controls into the left i was able to set what controlled what by loading up the locators int he right column. Doing this for all attributes was a nice little trick to learn.
I thought i should just add on the end of this that when needing to parent my clavicles to the spine 6 joint.. that didn't happen for me as you cannot parent from one joint to two separate joints so.. when parenting i had to create a parent constraint which allowed me to have two separate areas to parent each clavicle for each side.

The main red highlighted joint is the spine, you can just see the joint ahead which has red spikes coming from it.. and then just below that you can see where my clavicles are parented too of you follow the joint from the top shoulder.
Nostrils, Eyes and Eyebrows
To take more control over eye brows and nostrils i have used single placed joints, ik handles and parenting them to a nurbs circle which i have made the controller which allows me to select them easily without getting confused with other ik's or joint's inside the mesh.
Eyes
To create the eyes i have simply followed the book, i took these straight from Pocahontas' rig by exporting them as a binary file (ready to import into my gorilla scene)
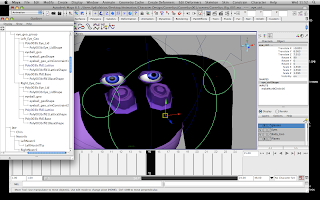
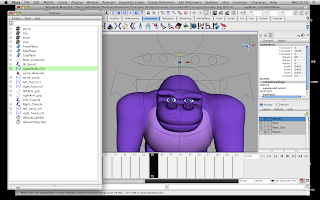
I have created a nurbs circle and then by selecting the eye control then selecting the eye geometry i had simply made an Aim constraint so that the eyes can move together as one making it appear as though he's focusing on a point. I have the Nostril_ctrl, EyeBrow_ctrl and face_ctrl parented to the Head_ctrl so they all happily move together. The above picture shows that i have control over the individual eye as well as moving them together (my mesh is black there as i hadn't sorted the material to be assigned to the correct material attribute).
Using the Set Driven Key to control the blinking was very simple, i had to first select the eye lid geometry and in the inputs select the makeNurbSphere as this was where i was animating using the start sweep and end sweep. I had parented the eye controller to the face control so i am working with the face control as the driver, i had to add an eye blink attribute so that i can control the blinking from the channel box when i have selected the face control.
Nose
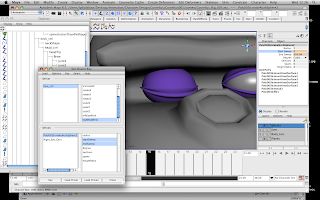
For the nostrils i wanted to be able to create a sniffing/wiggle expression when animating, i first thought about using locators and attributes like had been done with the feet however the nostril joints aren't effected by the rotation axis (if i haven't covered this it will be in the next post).
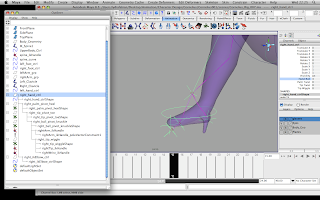
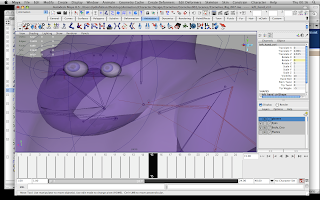
I firstly created two joints which were then parented to the chin joint, once the nostril joints were in place i then added an IK handle from the nostril base to the nostril tip. I was able to easily control each nostril as i had created nurbs circles which i can edit the values in the translate X and successfully effect the geometry.
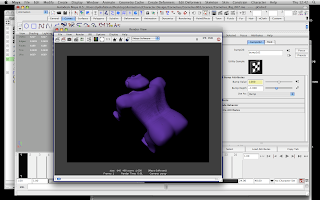
The above picture shows how the nostrils have been moved by using the controllers i had created. Obviously geometry bound to the joints here showing much need for weight painting with the crumple in the mouth and near the left eye.. even the chest i think. But i have successfully created a way to wiggle that nose!
Eye Brows
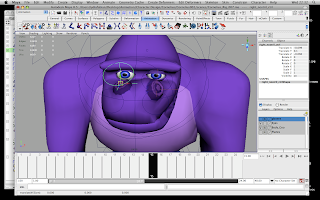
For the eye brows i thought all along the best way was to create single joints for the sections of the brow, parent the brow joints to the head tip joint, and then again using the nurbs circles as controllers above to easily select the eye brow joints, and placing these five joints in one big controller so i can control them all at the same time. Linking the joints to the nurbs circle by parenting.
Although the mesh is distorting the mouth muzzle and digging into the eyes again i will fix using the paint weight tool.
Eyes

To create the eyes i have simply followed the book, i took these straight from Pocahontas' rig by exporting them as a binary file (ready to import into my gorilla scene)
I have created a nurbs circle and then by selecting the eye control then selecting the eye geometry i had simply made an Aim constraint so that the eyes can move together as one making it appear as though he's focusing on a point. I have the Nostril_ctrl, EyeBrow_ctrl and face_ctrl parented to the Head_ctrl so they all happily move together. The above picture shows that i have control over the individual eye as well as moving them together (my mesh is black there as i hadn't sorted the material to be assigned to the correct material attribute).

Using the Set Driven Key to control the blinking was very simple, i had to first select the eye lid geometry and in the inputs select the makeNurbSphere as this was where i was animating using the start sweep and end sweep. I had parented the eye controller to the face control so i am working with the face control as the driver, i had to add an eye blink attribute so that i can control the blinking from the channel box when i have selected the face control.
Nose
For the nostrils i wanted to be able to create a sniffing/wiggle expression when animating, i first thought about using locators and attributes like had been done with the feet however the nostril joints aren't effected by the rotation axis (if i haven't covered this it will be in the next post).

I firstly created two joints which were then parented to the chin joint, once the nostril joints were in place i then added an IK handle from the nostril base to the nostril tip. I was able to easily control each nostril as i had created nurbs circles which i can edit the values in the translate X and successfully effect the geometry.

The above picture shows how the nostrils have been moved by using the controllers i had created. Obviously geometry bound to the joints here showing much need for weight painting with the crumple in the mouth and near the left eye.. even the chest i think. But i have successfully created a way to wiggle that nose!
Eye Brows
For the eye brows i thought all along the best way was to create single joints for the sections of the brow, parent the brow joints to the head tip joint, and then again using the nurbs circles as controllers above to easily select the eye brow joints, and placing these five joints in one big controller so i can control them all at the same time. Linking the joints to the nurbs circle by parenting.

Although the mesh is distorting the mouth muzzle and digging into the eyes again i will fix using the paint weight tool.
Subscribe to:
Posts (Atom)